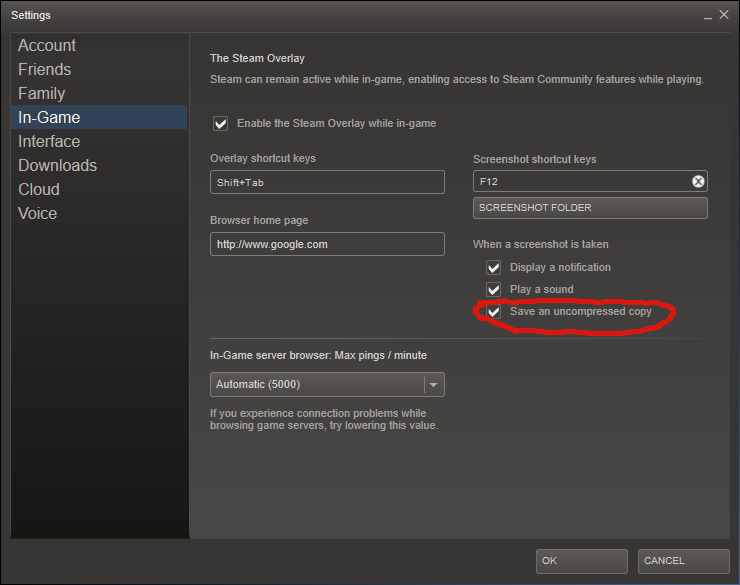
There's an option in the "In-Game" tab in the Steam settings menu to change the screenshot folder, but it doesn't seem to do anything? I took a screenshot after changing the location through the settings and the screenshot still went to userdata/id/760/remote. Is there any way to change where Steam saves your screenshots?
2 Answers
It doesn't say it, but the screenshot folder option only affects the uncompressed copies:

In order to change the location where Steam saves the compressed screenshots (which Steam can upload to Steam Community and are saved in the remote folder) you will either need to install Steam elsewhere or use some symlink trickery:
1. Delete or rename the existing default folder Make sure that [remote] folder doesn't exist inside your [
userdata/id/760] folder.2. Launch CMD as admin : Press Win+X there you will find an item option to launch Command Line with Admin privileges and write the following command.
mklink /D [Steampath]\userdata\[id]\760\remote "N:\ew\path\to\Screenshots\"
And that's it, now you can see your screenshots inside that folder.
This is how to do it in Windows (source), for Linux, swap mklink /D to ln -s
-
I think this claim is wrong. I checked off uncompressed copy and uncompressed goes into your left4dead2 folder (same directory addons is in). I changed the screenshot folder to a USB drive and after having latency screenshotting it was faster so screenshot folder might act as a "buffer" until game stops and it moves those into user data to be put onto the community. Commented Dec 11, 2019 at 23:21
The method above worked very well, but I have an additional note and a correction to the command syntax:
-Additionally you can use the method above to to "merge" two out of synch Steam directories, or amend your current screenshots directory with an old Steam installation or other computer's screenshots and combine both screenshot directories with some additional steps:
[VERY IMPORTANT]: MAKE A BACKUP OF BOTH STEAM "760" DIRECTORIES BEFORE YOU BEGIN IN CASE YOU MAKE A MISTAKE!!!
In addition two the "remote" folder there will be two ".vdf" files in the "760" directory, "remotecache.vdf" and "screenshots.vdf". You will have to manually sync these two files by amending the entries from the files in the "new" screenshots directory with ">"ones from the "old" screenshots directory.
Open up "remotecache.vdf" using a basic text editor (I recommend Notepad++). Copy the data below the "760" from the "remotecache.vdf" file in your old directory and paste it into the bottom of the "remotecache.vdf" file in your new directory, MAKING SURE NOT TO CAUSE ANY SYNTAX ERRORS FROM EXTRA OR MISSING BRACKETS {}.
See pictures "Steam 01" and "Steam 02" for an example.
The second file "screenshots.vdf" is a bit more complex, because it lists the screenshots first by the Steam ID of the game, and then by an arbitrary numerical order. You will need to copy/paste each individual game's screenshot entries one at a time. To do this, first copy the entries from the "old" "screenshots.vdf" file for a specific game ID (i.e. "72850" in my example pictures) to the "new" "screenshots.vdf" AT THE END OF THE ENTRIES FOR THAT SPECIFIC GAME.
See picture "Steam 03" for clarification.
After that you must rename the "order" of each individual screenshot to continue the numbering where it left off.
See the pictures "Steam 04" and "Steam 05" for an example of what I mean.
5 Repeat steps 4-5 for each game's ID who's screenshot directory you wish to merge.
Finally, save the new "remotecache.vdf" and "screenshots.vdf" files and copy them into the current Steam screenshot directory's "760" folder, replacing the old ones as needed (the one your game screenshots are currently being placed into).
Lastly, if you haven't done so already make sure to copy the all the old screenshots into the new screenshots directory, then follow the steps listed in the post above!
Example screenshots are found here: http://imgur.com/a/UZPzm
***One final note about the original answer's cmd command syntax: it may be simply that I am using Windows 7 64-bit and he is not, but I had to place BOTH file paths inside quotes "" for it to work!

